Wind Cave Trail in Mesa, Arizona

This past November, I was fortunate enough to travel with my club soccer to the National Tournament in Mesa, Arizona. While my team did not play as well as we had wanted to, our early elimination had one silver lining: we got to stay an extra day and go on a really cool hike!

Just a heads up – these are all iphone photos so they won’t be as great as quality of usual, but I think you can still get a good idea of the hike.

Wind Cave Trail is an easy, 3 mile, out and back hike in Usery Mountain regional park. The trail is fairly flat for most of the hike until the end where it gets moderately steep. The views from the tops are not the best I’ve ever seen, but the hike itself is really enjoyable, and there are a ton of interesting plants to see.

Our team’s goal while we were in Arizona was to see a lot cactuses, and this hike really delivered on that. Some of these cactuses were 15 plus feet tall and it was really cool. One of the girls brought along her polaroid camera and we had a lot of fun posing with cactuses and playing with her camera.

As I said earlier, the first part of the hike is pretty flat. You’re walking on a twisting path between a lot of cactuses. On a couple occasions, the trail dips down into a dried out creek bed. The trail is flat like this for about a mile.

Next, the trail begins to climb. It’s not that steep, but it climbs steadily. Sadly, the cactuses are not as frequent as you get to a higher elevation. The trail sort of follows the edge of the mountain until it wraps around and you make it to the caves. I was told by fellow hikers that the caves make a whistling sound when its windy out. From the caves, you get a view of the trail you just climbed, and a big sign made out of rocks on the side of the mountain that says Phoenix, Arizona with an arrow pointing towards downtown, Unfortunately, it was too far away to get a great picture of it.

IMG_5826
one of the steepest parts of the trail

If you keep climbing up past the caves, you get a cool view looking out over the park. This is a good place to take a quick break and maybe eat lunch or some snacks.

IMG_5856
#views

The climb down is fairly quick. I think the whole hike took us about 2.5 hours, but we were messing around and taking pictures and took a long break at the top. Even though we didn’t move on at Nationals, I’m still had a ton of fun in Arizona and I’m really glad we got to do this hike. If you’re ever in Mesa and looking for something to do, I would definitely recommend this hike!

IMG_2244
Thanks for reading!!

Red Rock/High School Hill Hike in San Luis Obispo

for my #slocals

Beginning Note: I have heard this hike called both Red Rock and High School Hill, but I think High School Hill is the more common name for it.

This is one of my favorite short hikes in San Luis Obispo. It’s a 4 mile out and back hike that’s moderately difficult. My favorite part of the hike is that there is an interesting metal structure at the top that you can climb and play around on. When it’s clear, there are great views of Bishops Peak, Madonna, and you can occasionally see all the way to the ocean. In the spring when the hills are green and the wildflowers are blooming it’s especially beautiful. This hike is also part of the Three Peak or Tri-Tip Challenge in San Luis Obispo where you hike Bishops, Madonna, and this hill and then you go eat a tri-tip sandwich at Firestone Grill downtown. If you have a whole day to spend in SLO and enjoy hiking, I would definitely recommend doing these three hikes (and getting the sandwich because Firestone is bomb).

Another great thing about this hike is that it’s very easy to find the trailhead. It’s at the end of Lizzy Street. You drive up the hill until the street end and then the trail starts there.

The trail starts on a fairly flat, but rocky, narrow trail that is fenced in my a wooden fence. This is the only part of the trail that is shaded by trees so enjoy it while you can.

After this first part, the hike basically just climbs at a fairly steady and steep pace until you reach the top of the hill. The trail cuts up the hillside, and there are often wildflower and Yucca plants in bloom along on the trail. Unfortunately, on the way up your back is turned towards the view, but, because this trail is such a steady climb, I usually take some breaks and that offers you a chance to turn around and look out at the view.

Another note: if it has just rained or it is going to rain, DO NOT DO THIS HIKE. It gets super slippery when its wet because of the steepness and the rocks on the trail. I also would not recommend this hike for a sunrise hike due to the weather in SLO. It’s often foggy in the morning and usually doesn’t clear away until mid morning. I made the mistake of doing this hike at sunrise once and the fog was so thick that it looked like there was a white sheet behind us in photos.

Once you reach the top, you’ll have great views of all of San Luis Obispo. The town and Bishops Peak are laid out in front of you, and then to the side you can see the rolling hills of the Paso Robles grade. There is also a metal structure/bell tower at the top that I have always taken the time to climb and play on. This structure used to be red, but I believe it is currently green.

Overall, this is a fun, quick, but difficult hike that provides you with great views. It’s in a fairly central location in SLO and easy to find.


Yosemite 2017 – Day 5

Hetch Hetchy and home!

Today we hiked Hetch Hetchy Dam. This dam was created in 1923 with the daming of Tuolumne River and began to deliver water to the San Francisco area in 1934. The creation of this dam is rumored to have contributed to the death of John Muir because he was so saddened by the loss of this beautiful valley. The valley is described as having natural beauty to rival Yosemite Valley. The Sierra Club still has a campaign to restore the valley to what it was like before the dam was created and open it back up to the public. As I walked along the water in the valley I too couldn’t help but mourn the loss of what would have been a gorgeous area to hike and camp in. Similar to Yosemite Valley, it has natural domes, huge and gorgeous waterfalls, and a river that would have run through its center. While draining the dam may be unrealistic at this point because it supplies water to such a huge area, as I hiked across the dam and looked across the filled in valley I could almost imagine what could have been had this area not been altered and, as a staunch conservationist, deeply regretted the loss of what should have been a protected area for the public to enjoy.

A photo of the valley before it was filled with water.

Even though the area has been massively altered by the creation of the dam, the hike is still quite beautiful. The first step to the hike is walking across the dam itself. It is a stark contrast between the calm waters of the reservoir on one side and rapidly flowing water on the other side. From this point, you have a view across the whole valley. We went incredibly early in the morning, and the sun was rising above the valley so the pictures look a little discolored despite my efforts try every exposure and aperture setting on the camera. The pictures I took here don’t quite capture the natural beauty of this area.

Next the hike walks along the water. It may have been a high year of rainfall when we went, but we were no more than 10-20 feet above the water for the next mile of the hike. It is fairly flat at this point with a wide trail where my dad and I were able to walk side by side.  As with the rest of the hike, you occasionally catch panoramic views of the valley through the trees that line the trails.

The next part of the hike is on uncovered rock that starts to go a lot steeper uphill and then back downhill. This pattern of uphill and downhill recurs a few times. If it wasn’t 8 am in the morning when we were doing this hike I would imagine that this would be uncomfortably hot because there’s no tree cover on this part of the hike.

After a final uphill and then downhill push, you finally arrive at the waterfall. This waterfall must have been huge and beautiful before the dam existed. Even as is, it was still one of my favorite sites we saw this week. The waterfall sprays down in multiple separate places and mists off the rock forming little mini rainbows in every direction. The water from the falls actually gets the trail a little misty and it felt very refreshing after the hike it took to get there. The trail in this place is actually a long bridge and the water from the falls runs under the trail in places and into the reservoir. This waterfall is easily the best part of the hike.

Overall, this hike was very easy, had some great views over the reservoir, and ended with a gorgeous waterfall. If you’re ever in this area, I would recommend it but I wouldn’t go out of my way to do this hike. It was nice, but it takes a long time to get there because the road is windy and narrow, and the entire time I could just imagine how the valley would have looked before it was filled in with water. It really is a tragedy what happened to this valley, and I can only hope that us humans are more thoughtful about using nature for our own gain in the future.

The valley before it was filled with water. You can see the waterfall I have photos of as well as the river that used to run through the valley.

This ended our trip to Yosemite. I had a great week with my dad and Shayna and we were already planning on next trip on the car ride home today.

IMG_9577

Thanks for reading!

Yosemite 2017 – Day 4

Gaylor Lake Trail and Mine

My friend, Shayna, left us to go home and see Hamilton this morning, but, after showing her the pictures, she was really bummed she missed this hike. Today we did the Gaylor Lakes Trail and it may have been one of the most beautiful places I have ever been. This hike is definitely one of the best kept secrets in Yosemite. There were maybe 15 other hikers we saw on the trail, and we were on this beautiful trail for four hours because it was just so pretty we didn’t want to leave.

Four hours sounds like a long time, but the trail itself is actually quite short at about 4 miles long roundtrip and only has a 600 foot elevation. Like everything we have been doing in Yosemite, it is at a very high elevation and the start of the trailhead is already at 10,000 feet elevation. The trail is off of Tioga Pass, and so is open whenever that road is open (usually October-Septemberish). I would recommend bringing bug spray because you will be surrounded by lots of water and the mosquitos definitely came for me. I went home with over 30 bug bites!

The hike starts at a decently steep incline up a trail that takes you through some trees and near a stream. It’s almost an uphill meadow because there’s a lot of grass but there’s also a lot of trees. This part of the hike had some gorgeous wildflowers decorating the trail. My dad and I were in no hurry to rush through and I kept stopping and taking picture of flowers.

Eventually, the trail changes into more of a wooded area instead of a meadow, and then it crests up into an  area that is straight rock that’s tinged red from all the iron in the ground. It’s a bit hard to describe because this trail would literally look like three or four separate hikes if you were to look at my pictures from the day. Once you get to this crest it completely changes scenery. Behind you, towards the valley, is all of Dana Meadow and it’s numerous ponds and streams stretching out before you. In front of you is a view of a gorgeous alpine lake and mountains in the background. The natural beauty of this place will take your breath away.

As you can see, you have to climb down to the lake, and then the trail follows it closely on the side. Close enough to where at one point I squatted down and put my hand in the water because I was curious how cold it was. (It was very cold). There were lots of wildflowers here too just like earlier in the hike. The lake was a deep sapphire blue color and looking out over it on the trail had a postcard-type view of some of the tallest peaks in the park. You almost get the sense that you’re looking off the edge of the world.

The next part of the hike feels like you are in the Sound of Music. The trail runs next to a stream up a grassy meadow. The path actually crosses over the stream a few times as it goes slightly uphill towards another lake. There’s a lot of wildflowers at this part of the hike too and the grass was incredibly green when we were there in late August. At the crest of the hill, you see another lake that is framed by a mountain. There was actually a large patch of  snow when we were there, which was so strange to see because it was about 75 degrees out. The trail actually went across the snow, so my dad and I made some snowballs.

After we had shuffled about 100 yards across the snow, the trail continued up a hill above the lake, The scenery completely changes here. The ground has much more iron here and it is a deep red color as you walk up the hill overlooking the lake. Once you reach the top of this hill, you see a partially fallen down house made out of slate. If you walk a little further, you can see two sunken in mines. In the early 1900’s, there were silver mines up here, but they collapsed after they went out of use when they didn’t prove fruitful. The partially built houses up on this hill are the houses of the miners who used to live there. It was super cool to walk up around here and imagine how these miners might have lived in this incredibly isolated area. It would have been beautiful, but lonely.

This was definitely my favorite hike of the trip. It wasn’t the longest or the most well known, but it was incredibly beautiful and not very trafficked. Of all the hikes we did this week, this is the hike I would be most likely to do again and I would highly recommend it to anyone who finds themself on Tigoa Pass.

IMG_9426

Thanks for reading!

Yosemite 2017 – Day 3

Cloud’s Rest

I have wanted to hike Cloud’s Rest since I first learned about the hike a few years ago, and it was at the top of my list when we were planning this trip earlier in the summer. Cloud’s Rest is a 14.2 mile hike with about 1800 feet of elevation gain. From the top, it offers one of the sickest views of Half Dome in the park, along with views of Tenaya Lake, Mount Hoffman, North Dome, and so many other peaks that we could only begin to name when we pulled out our map. When we did the hike, it wasn’t terribly crowded, but there were other hikers on the trail. We did start pretty late in the day, around 10 AM, because we had hiked Pothole Dome first, so that may have made it seem like there were less hikers than if we had started the hike earlier in the day.

This first couple miles of this hike are a flat nature walk through the Tenaya Lake Valley. It’s shaded and smells like trees and is generally very enjoyable. It sort of makes you think like hey, this hike might not be too bad (you are wrong of course). You also walk next to a river for parts of it, which is nice.

Funny story time: I was using fairly new hiking shoes on this trip, and after we hiked Pothole Dome this morning, I spent about 15 minutes cutting up moleskin and bandaging my blistered feet. About 200 yards into the hike, there is a stream you have to ford and I just thought “oh no, now I have to stall our hike even longer”. I thought I was going to have to take the bandages off my feet, walk across the river, and then rebandage them. But, then my dad pulled through and won MVP of the trip when he carried me across this stream. Other hikers on the trail thought it was hilarious.

After that pleasant nature walk where you’re tricked into thinking this hike will be a breeze (I should’ve known better, we were in Yosemite after all), you gain 1000 feet of elevation in a mile on a bunch of switchbacks. The only redeeming thing about this part of the hike was that parts of it were in the shade. It’s not quite Half Dome status, but its certainly not fun to gain this much elevation this quickly at such a high elevation.

The next part of the hike was a pretty steep downhill for quite awhile (that you will feel on the way home) and then another nature stroll through some woods. There’s a small lake that you pass and a stream and lots and lots and lots of wildflowers. There were so so many lupins when we went, it looked like a fairy forest of lupins because at points they just blanketed the ground. There is a lot of water in this part of the hike, so there are also a lot of mosquitos. If you want to stop and take pictures, be prepared to be bitten. I ended up with 37 mosquito bites at the end of this trip (but don’t let that stop you from doing this hike, mosquitos really like my blood for some reason and my dad did not end up with that many bites).

After that, you start your ascent up Cloud’s Rest itself. It’s definitely not as steep as the first climb of the hike, but it’s not a comfortable uphill either. The scenery at this part of the hike isn’t really that great, so we just powered through this part with few stops until we reached the peak.

The peak of Cloud’s Rest is one of the coolest places I’ve ever been, but it was also terrifying for someone like me who has quite the fear of heights. On one of the sides of the peak is the furthest drop in the park. If you fell from here, you would fall around 5,000 feet. The way the peak looks is that it starts as a wide base, and then it gets really narrow as you get closer to the peak, and then once you make it to the top (where all the dope views are) it widens out again. The one thing I will say is to be very careful on that narrow part. If you trip, you’ll probably be fine, but a part of me felt like a strong gust of wind would just blow me off the face of the Earth.

THE VIEWS FROM THE TOP ARE SOME OF THE COOLEST THINGS I’VE EVER SEEN. You get one of the best views of Half Dome in the park, and can see so many other peaks. Using a map, my dad and I found Mt. Hoffman, North Dome, Tenaya Lake, and various other peaks. Even with the fires that were happening while we were there, the views were still amazing. I can’t even imagine what it looks like from the top of this peak on a clear day.

I highly recommend this hike and I would definitely do it again. Although it’s long, it’s not ridiculously difficult, and the views from the top are worth it.  10/10 would recommend.

IMG_8450
This is literally the coolest photo anyone has ever taken of me.

Can’t beat Yosemite! Thanks for reading!

Yosemite 2017 – Day 3

Pothole Dome

Today, we hiked both Pothole Dome in Tuolumne Meadow and Cloud’s Rest, but in this post I’m going to focus specifically on Pothole Dome (mostly because Cloud’s Rest really does deserve it’s own separate post).

Pothole Dome was about a 2-3 mile hike with only 300 feet of elevation gain (which a breeze compared to yesterday). Unlike some of the other hikes we did this week, I never felt like one misstep would mean near-immediate death, and it can be comforting to have that kind of security on a hike (especially when you are doing an abundance of near-immediate death hikes). When we went, the crowds were light. We did not see any other hikers on the dome; the few hikers who we passed were on the Tuolumne Meadow Loop.

Fun fact about me: I am OBSESSED with meadows. There’s something about a field of grass and wildflowers in the middle of a forest that really makes me content. I could wander in meadows all day without seeing gaining any elevation and be perfectly happy. I also love taking photos of wildflowers, and meadows often provide many different kinds of flowers as well as many different kinds of lighting to experiment.

Pothole Dome is on the west end of Tuolumne Meadow. It doesn’t have much of a trailhead, but there are a few spots you can pull into right off of Tioga Road. It’s easy to miss though, so make sure that you’re looking out for it.

The beginning of the hike is just through the meadow and then it skirts around the edge of the dome. When we were there, there were lots of white and yellow wildflowers and the grasses were very tall and green.

Finding the place where you actually start walking up the dome is a bit tricky. Basically, its when the trail curves left for the first time and when the trail curves left for the second time. You have to walk through a small patch of trees and then you just walk right up the rock.

It is a bit strange to be walking up what feels like concrete in the middle of a wilderness, but that’s how you make it to the top. There’s not really a trail (although there were some markers when I went), but it flattens out at the top so you should know that you made it. It’s not particularly steep, but we were all breathing a bit harder by the time we reached the top.

IMG_8940

The view from the top is, like everything else in Yosemite, beautiful and varied and the type of view you could only find in Yosemite. You can see clear across the meadow all the way to Lembert Dome. The river snakes lazily through the meadow in wide curves that look fake from the height you’re at. Off in the other direction is Unicorn Peak which was till covered in snow. Facing the road is a massive face of granite that I don’t even think you can hike. For such a short hike, you get incredibly varied views in all directions.

I would definitely do this hike again. It was short, easy, and had a big pay off at the top. Plus, you get to walk through a meadow, and meadows are the best.

img_8432.jpg

Thanks for reading!

Yosemite 2017 – Day 2

Lower and Upper Yosemite Falls

On this day of our trip we hiked lower and upper Yosemite falls, although I’m not sure I would call lower falls a hike so much as a nature walk on pavement. It’s a half mile loop there and back that’s really easy and mostly flat right up until you get to the viewing point of the falls. The falls, of course, are gorgeous. This is a great hike to do as a warm-up, if you don’t have that much time, or if you have someone with you who has limited mobility. We did it as a warm-up before our main event, which was hiking upper Yosemite falls.

Warning – I would not recommend hiking upper falls unless you are a fairly experienced hiker and don’t mind lots of people on the trail with you. The trail is 7.2 miles round trip with 2,700 feet elevation gain. It’s a difficult hike, and, to be perfectly honest, the hike isn’t all that attractive until you make it close to the top. It was an alright hike, but it’s definitely something I only want to do once.

The trail starts up a series of steep switchbacks that seem like they go on forever. The switchbacks are, however, in the shade because you are surrounded by trees. It makes it difficult to get a view of how far you have climbed up, but we welcomed the shade on the hot August day in which we made the hike.

After you finally reach the top of what seems like endless switchbacks, you reach this plateau area where the trail is fairly flat, and there’s even some downhill (which is annoying on the way back). There’s some gorgeous views of the valley floor and half-dome and, when you go around the corner, you get your first view of Yosemite falls on the hike.

This flat area of the trail leads to, you guessed it, more switchbacks! This is definitely the hardest part of the hike because the switchbacks are steep, long, and 100 percent in the blazing sun. You do, however, get some pretty sweet views of the valley floor as you climb. Coming from sea level straight into this hike I actually got a bit of altitude sickness. Just take it slow and remember to bring lots and lots of water!

I won’t bore you with any more descriptions of the switchbacks. Just know that it was long and tiring and took a freaking long time to hike. Eventually, the switchbacks flatten out and you reach the top. I know you’ll probably want to stop here and never move your body again, but if you can garner up the energy, I would recommend walking the extra couple hundred yards up to the top. Here you get a view over the valley floor and of half dome. You can even look out over the waterfall which is awesome but a little freaky.

Another route you can take at the top is to the bank of the river that tumbles into Yosemite Falls. We sat and ate our lunch next to the river. However, please please please do not wade into the water. It’s easy to forget when you’re sitting along the peaceful, slow moving river, but you are at the top of one of the tallest waterfalls in the world, so treat the river that runs into that waterfall with respect and caution.

After a short rest and some lunch, we headed back down the trail. It was hot and dusty, but going downhill was significantly easier, and the sky was clearer of the smoke from the fire so we had a much better view of half dome and the valley floor on the way down. This hike was challenging with lots of awesome views. If nothing else, you get to stand on top of one of the tallest waterfalls in the world.


Yosemite 2017 – Day 1

Travel Day and Tuolumne Grove

So it is once again the best time of the year which is summer because that’s when I’m able to spend the most time in the outdoors. This year, my dad and I decided to take a summer trip to Yosemite because we both love the park and had a few big hikes we both wanted to do there. My friend Shayna is along for the ride too, but she’s left a day earlier than us because that loser has Hamilton tickets for the weekend.

Anyways, the way we planned this trip was a bit different than many of our other trips. Instead of doing a big backpacking or camping trip, we decided to actually AirBnB a house about 40 minutes outside of the north entrance to the park because I needed to be able to put in my weekly 12-15 hours of studying for the LSAT and my dad was on-call for work. From this house, we drove to various hikes in the park such as Upper Yosemite Falls and Cloud’s Rest (and many more). When my dad first suggested this idea for the trip I was hesitant because I felt like it wasn’t “real hiking”, but it has actually been a very cool way to get an extremely varied experience of the park and still be comfortable in the evening. (Don’t worry though, we’re planning a “real” backpacking trip to Sequoia National Park next summer already).

We got up the first morning bright and early and managed to make it out the door at around 7 am. The drive itself was very uneventful, and we made it to the entrance of the park around 1 pm. My dad had been told by a ranger that there was a half hour to an hour wait time just to get into the park but there was only one car in front of us so we didn’t have any problem. Since we got there much earlier than expected we decided to do a short hike in Tuolumne Grove to get ourselves acclimated to the higher elevation and kill some time before we could go to our Airbnb and because Sequoia trees are gorgeous and very large.

Unlike many parts of Yosemite, there is a decent amount of close parking for this trailhead. We didn’t find a spot in the actual parking lot (of course), but we found a spot about a quarter mile down the road. I’m actually way happier we parked there than in the lot because the road ran through a meadow full of wildflowers and it was so pretty. (I also literally love meadows so much).

The hike itself is real short and easy. The signs by the hike kept giving different lengths for the trail, but if I had to guess I’d say it was around 2.5 miles (so about 3 miles total for us from our car). You start walking downhill on an old fire road surrounded by trees (that are not sequoias at this point unfortunately). It gets pretty steep at parts, but the trail is wide and flat and parts of it are paved, so it’s easy to walk on.

The actual Sequoia grove is at the bottom of the fireroad where the trail flattens out. Down here is about a half mile loop that takes you through the grove and past (and through) some awesomely tall and gorgeous trees. It’s much narrower and a little more rocky, but the trees are gorgeous. The orange-brown color of Sequoias is so unique, and it’s crazy to me that some of these trees have literally been around for 2000 years (that’s the time of the Roman Empire!)

Here’s some other fun facts of Sequoias:

  1. They can live up to 3,000 years old.
  2. While sequoias can grow up to 300 feet tall (that’s about the height of a 26 story building) they are mostly known for being massive in diameter and width.
  3. The largest tree by mass is a sequoia tree know as General Sherman (although the tallest is a coastal redwood but shhhhh sequoias are still cooler).
  4. The General Sherman tree is 2100 years old!
  5. Sequoias reproduce by seeds in cones, which require fire to release them from their pods. Sometimes seeds spend 20 years inside a pod before they are released.
  6. Their seeds are also tiny, there are about 91,000 of them in one pound.
  7. They are pretty much only found in 77 groves in Northern California, but there are some in Europe that were planted in the 19th century.
  8. They are incredibly resistant to fire and disease and could (probably) survive an apocalypse because they are so hardy.

Anyways, back to the hike. One of the first sequoias you see is just massive. Here’s me and Shayna for scale.

Another cool part of this hike is the tunnel tree. It was carved out as a tourist attraction in 1870. Here we are again for scale. (Don’t worry, they didn’t carve it out until after the tree was already dead). It has that double pronged top because it was hit by lightning at some point. The inside of the tree is very carved with people’s names and had almost a polished appearance because so many people have run their hands over it.

Another cool attraction of this hike is a fallen over sequoia tree. You are able to see the underside of its massive root system and really get a sense of how tall these trees could grow because you get to walk next to it.

The last part of the hike is just walking that mile back up the fire road. It can get pretty steep but, compared to most of my hikes, this one was really short. I would rate it on the easy to moderate scale. It’s certainly not flat, but it’s short and more than half of it is downhill or on mostly flat ground so it’s really not that bad. It didn’t offer those grand sweeping views of rock formations that Yosemite is so famous for, but Sequoias are just as beautiful in their own and I really did enjoy this short hike.

After the hike, we made our way out of the park and went to a grocery store to pick up some food for lunch and dinner for the remainder of our trip. We got to the Airbnb, made dinner, and hung out, planned our day for tomorrow, and watched a movie (or, in my case, did LSAT problems) until  bed time. Tomorrow we were planning on doing Bridal Veil Falls, Lower Yosemite Falls, and Upper Yosemite Falls.

Thanks for reading! Here’s some more tree pics 🙂


The Ridge

The Best (and pretty much only) hike in Avila Beach, CA.

Disclaimer: I have probably done this hike over 50 times, which means that the pictures I have will be from various hikes, and also that many of the times I have been there I didn’t even take pictures. For example, I did this hike this past week, and I didn’t take a single photo, which I’m regretting now, because the fog created a cool effect over the ocean that I now don’t have a photo of. But I do have a million other photos that span over various years, so get excited.

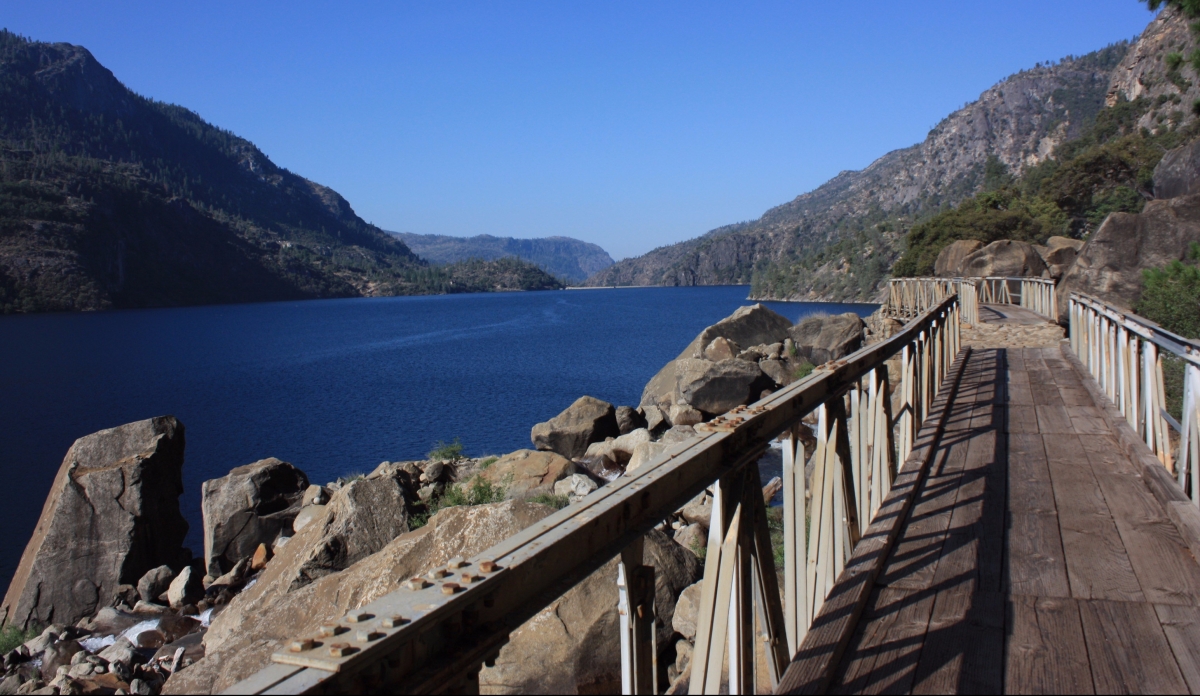
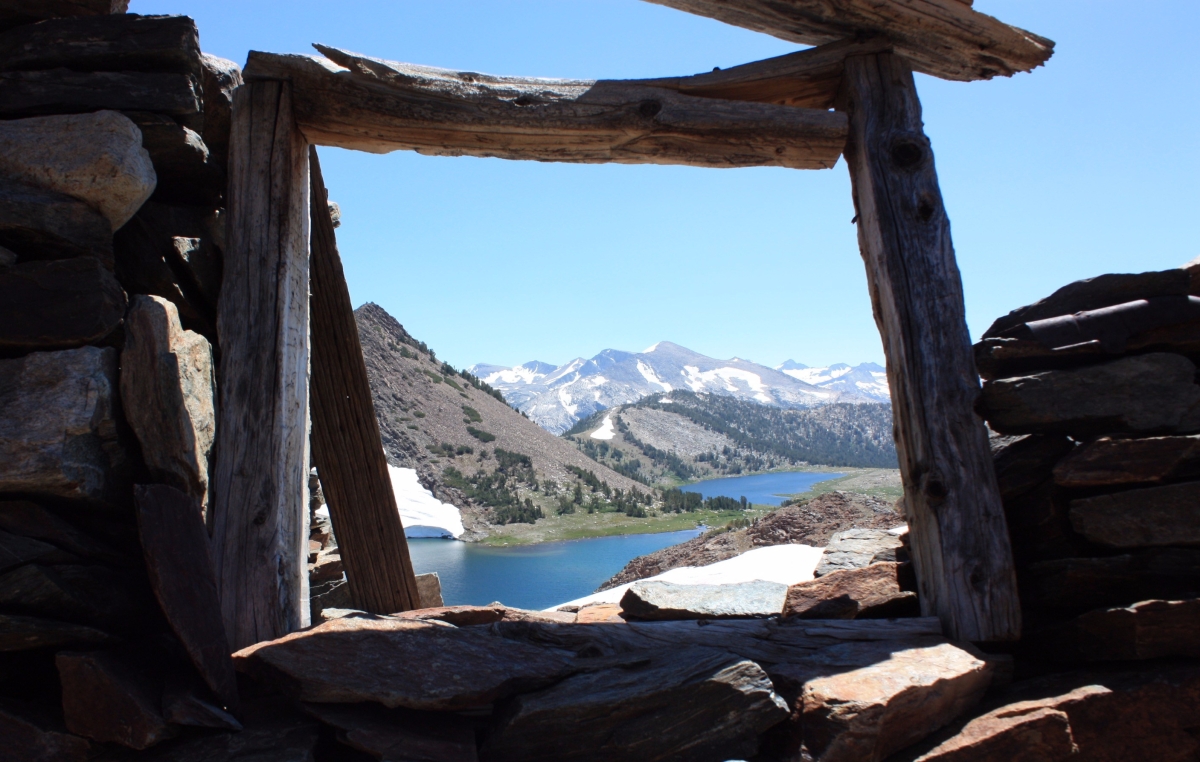
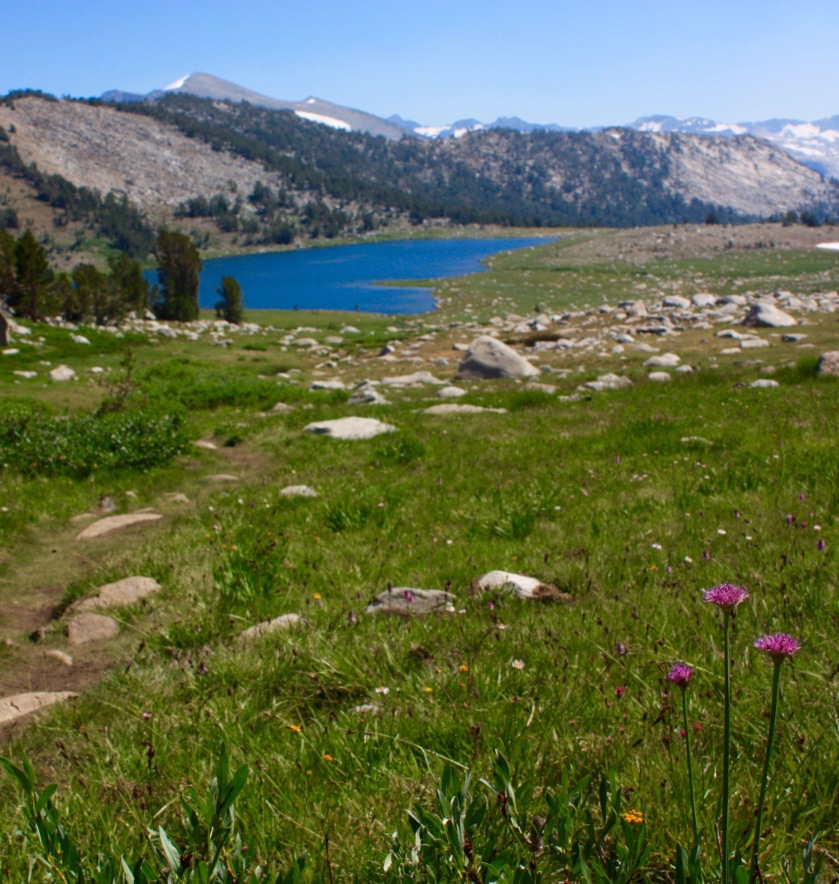
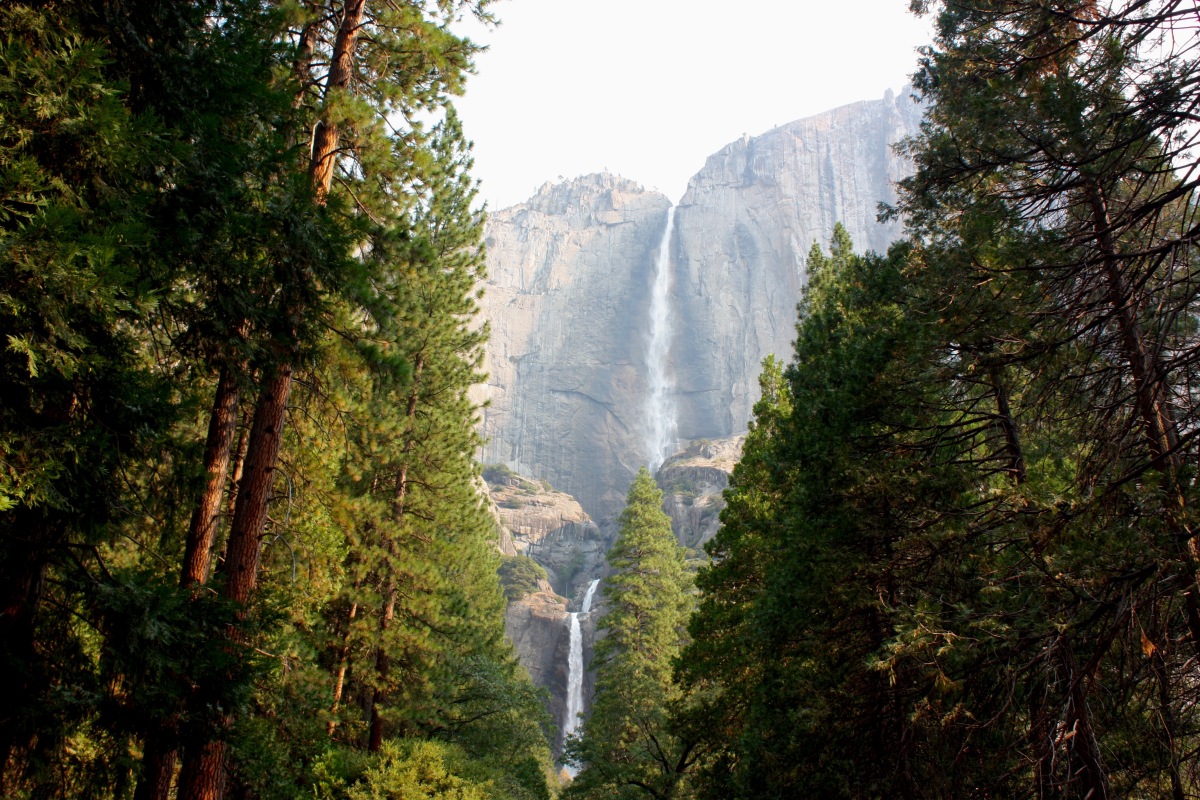
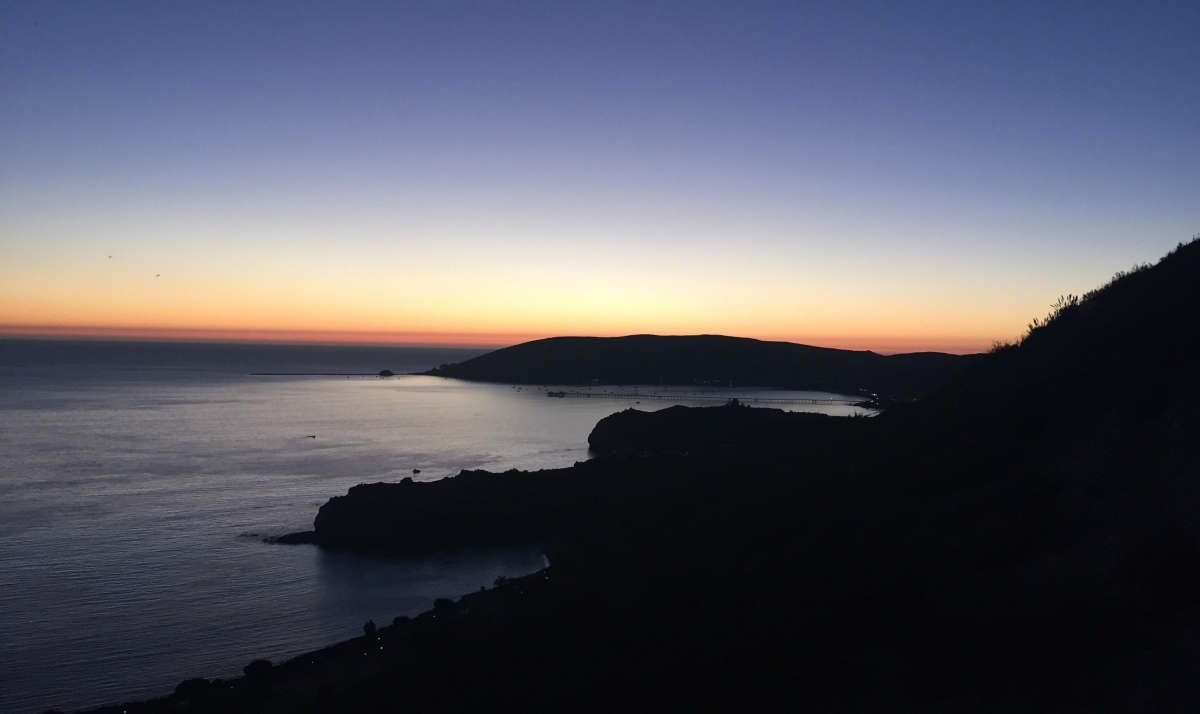
The Ridge is a gorgeous hike and I think perfectly encapsulates the beauty of the Central Coast. You have panoramic views of the ocean for over half of the trail, and there are some fun and interesting caves/beaches you can explore at one point as well. You also have views of the grape and agricultural fields at various parts of the trail. It’s a respectable 3 1/2-ish mile trail which makes it perfect if you don’t have a ton of time but want to get some nature in. I’ve also had friends who have stopped here and hiked it with me while they were driving North on the 101 because it’s right off the freeway.

Sorry, I know some of these photos aren’t up to par but I’m fairly confident that last photo was taken on the first cell phone I even owned just to give you an idea of how long I have been doing this hike.

To get to the trailhead, you actually need to be in Shell Beach. You turn onto El Portal and Drive down that street until it runs into a fence. To the left of the fence there is a driveway and to the right of the fence there is the trailhead. Drive down the driveway and park your car in the lot. It’s really small, so if there’s no spots you can also park on the street across from the trailhead.

The trailhead starts you on a flat trail with your back to the ocean that basically walks below and next to the “ridge” mountain that you are later going to climb up and then back down. Right before you hit the 101, you start up a very steep trail. I know it sounds like it would suck to do a hike right next to a freeway, but once you’re past that initial climb, you can’t see it at all. And while you climb, you can see the ocean and the hills of the other side of the 101 so it’s never been a deal breaker for me.

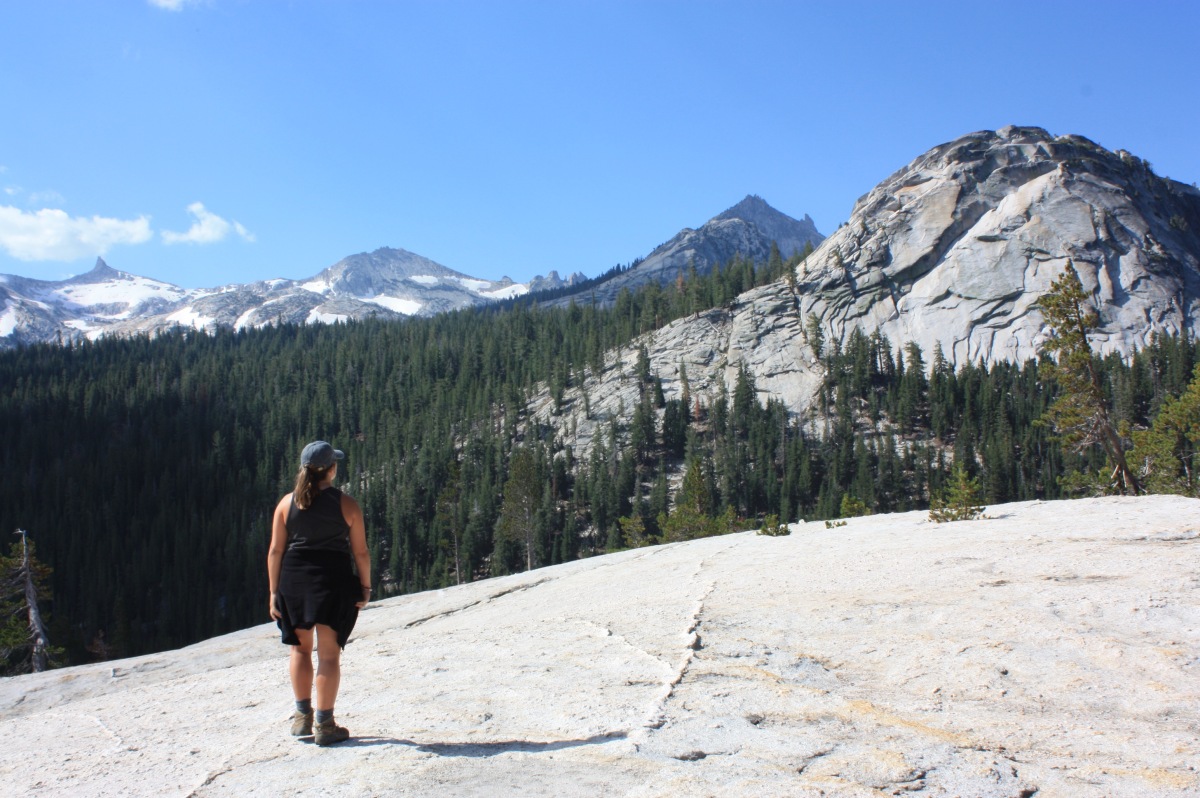
Once you make it to the top of the ridge, you go through a series of up and downs as you traverse the trail. The rule with this trail is if you think you’ve gone up the last hill before you start walking down, you have one more. But fear not, the views along the way of the ocean and the houses in Shell and the agricultural fields means that you don’t really notice the incline all the much. Like seriously, the views are amazing.

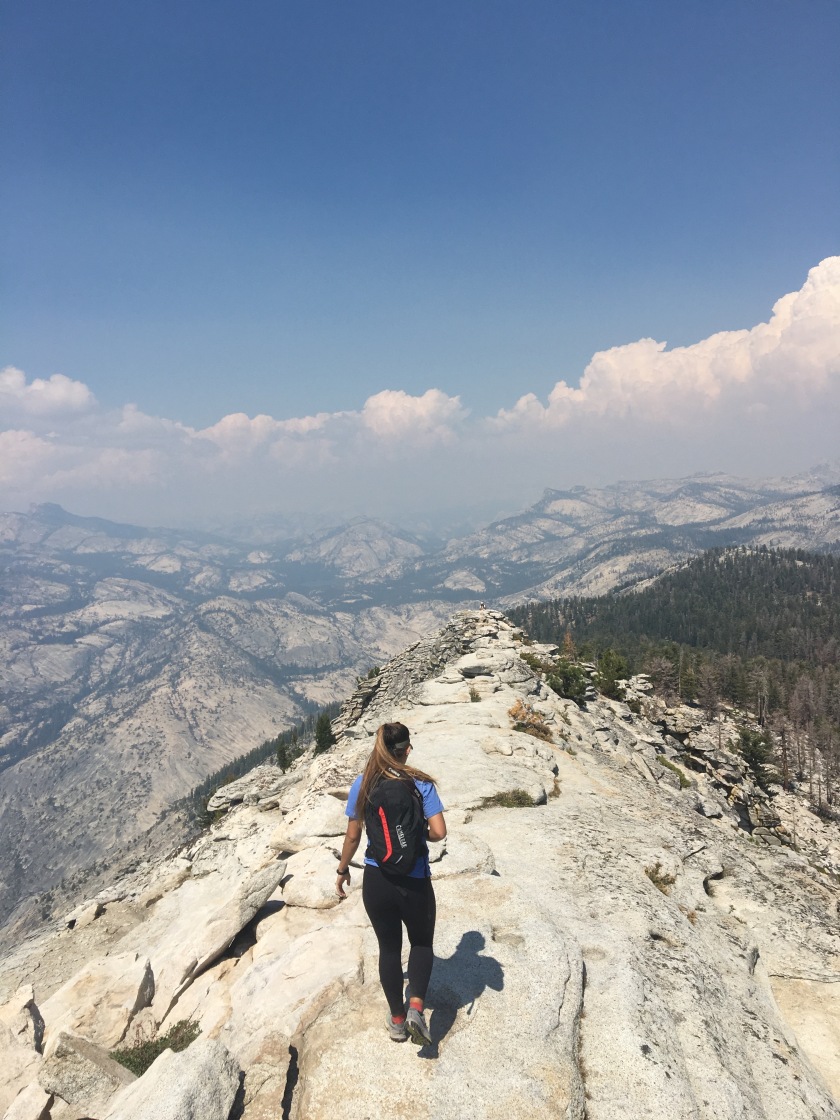
After all that spread out uphill, you now get to do a very tricky and fairly dangerous thing: walk all the uphill back down in a very short amount of space. This part of the trail is essentially straight down. Make sure your shoes have some tread folks because you will be sliding a bit.

Side note: I’ve actually slid down this hill on pieces of cardboard in the middle of the night and had the cops called on us because our gleeful screams were confused for an injured hiker. The cop literally ran up this hill and we were all very impressed with his fitness level. We all thought we were going to get in trouble but the cop was pretty amused when we told him what we were doing and just told us to keep the noise down.

After that lovely downhill, it’s pretty much flat from here. If you go to your right there is a beach (that you have to climb down to) and some pretty sweet caves to explore. If you go to your left you are in the parking lot of Pirate’s Cove Beach. Fun fact: Pirate’s Cove is not a public beach, so if you wanna get naked/participate in some illicit activities (if you are of age of course) this is the beach to go to on the Central Coast.

After you’re done exploring, the trail takes you past the gate on an old fire road that is no longer in use that goes on the bluffs above Pirate’s Cove beach. You don’t get much a view, because you’re surrounded by tall fennel, artichoke, and yucca plants, but the purple flowers from the artichoke and white blooming Yucca are pretty, and the fennel makes the whole part of this trail smell like black licorice.

After you get to the end of the fire trail, you actually walk down Bluff Drive/Trail, which is a sidewalk trail with the ocean on one side and giant McMansions on the other. I am a fan of ignoring the signs that say pedestrians must walk on the sidewalk and like to walk on the street because 1) the sidewalk has inclines and declines and the road does not and 2) the road offers you a better view of all the giant mansions and I like to look at them. Pretty much this entire street is #housegoals.

The end of Bluff trail is where your car is parked if you’re parked in the lot. If you’re on the street you’re going to have to walk out of the lot and then you’re there. If you’re ever visiting or even just driving through the Central Coast I would highly recommend this hike. It has varied scenery, it’s quick, it’s not too easy or too hard, and people at many different fitness levels are able to complete it.

Some other notes about the trail: a lot of people actually do it in the reverse direction. I’ve done it that way once before but I didn’t like it because it’s really not fun to walk up that monster hill and then after that you might as well go sit back down because the rest of it is essentially downhill. I also like facing the ocean on my way up most of the hike and then down that monster hill as opposed to having it at my back for that first part of the hike and then a significant portion of the rest of the hike. It’s also very pretty to do this hike at sunset, but there are a few unmarked turn-offs and it’s hard to walk down that steep hill in the dark, so I wouldn’t recommend that if you’ve never done this hike before. All in all, this is a great hike that everyone who loves the ocean and enjoys creeping on rich people’s houses will definitely enjoy.

Until next time! 🙂


Mount Baldy

June 17th, 2017 – This hike had its ups and downs… literally

Mount Baldy is the highest peak in Southern California at 10,064 feet of elevation. Mount Baldy is a nickname for the mountain; the actual name of the mountain is Mount Antonio. People nicknamed it Mount Baldy because the peak is so high in altitude that no vegetation will grow on the top and someone looked at the mountain and thought it looked like a bald man’s head. Thus, the name Mount Baldy was born. Even though it’s a nickname, the name Mount Baldy is more commonly used and the street to up to the Mountain and the town at the base of the mountain are both called Mount Baldy. Have I used the word Baldy enough?

This hike is rough, but beautiful. There’s A LOT of elevation gain in a fairly short time period and then going back down isn’t any easier. You can do the hike in a loop, which is always nice so then you get to see different things on the way up and the way down. We took Devil’s Backbone trail up to the summit and then Baldybowl trail on the way down.

To get to the hike, you have to drive up a windy road through a tiny town that reminds of the towns near Yosemite that are sort of nestled in the crook of a mountain. The road has some sharp turns and at some points it curves around at nearly 180 degrees.

The trail starts up a fire road. At first it’s paved and then it turns into a gravel road at the turn off to go up the Devil’s Backbone trail. The trail climbs fairly steadily, but it wasn’t too difficult and we still managed to do about a 20 minute mile. The trail is actually really pretty and there is a view through the mountains towards the ocean the entire time you walk up. We couldn’t actually see the ocean because there was a lot of haze, but I bet without the June Gloom there you would be able to see it in the fall or spring. There are also a lot of beautiful Yucca plants on the trail peppered among the pine trees and manzanitas. Right when you start up the trail about a half mile in there’s a pretty view of a multi-layer waterfall. As you’re walking up the trail in this part there is a ski lift running up the mountain that the switchbacks of the path sort of zig zags under. All I can say is that I really wanted to get on that ski lift a few times.

Eventually, the trail literally runs into the ski lodge. At this point we got a little confused because we thought it was strange that a trail just ran into the lodge, but my dad ran inside the lodge and asked one of the workers where the trail was and he told us to take the middle trail that run under the ski lift. My dad and I both took a photo next to the ski lodge because there was a cool sign that said “adjust your altitude” and because it perfectly framed Mount Baldy in the background. It also was definitely very weird to see a bunch of equipment such as snowmobiles and sledding hills without any snow.

I’m going to be honest with you, the next part of this hike is straight up awful. You gain so much freaking elevation in so little distance. The trail from the ski lodge is pretty steep, but it’s also kind of nice because you can finally see over the top of the mountain to the other side. It’s a pretty view because you can see the mountains on the other side and the squares of agricultural fields cut out in the distance beyond the mountains, almost like you’re looking at it from an airplane.

The next part of the hike is called Devil’s Backbone, and it’s aptly named. There’s a steep drop off on one or both sides of the trail at this part. It kinda does look like you’re walking along the backbone of the devil. It’s a little freaky at times because the path gets really narrow, but as with the rest of this hike, the views are really pretty. This past winter, there were actually two hikers who fell to their death off of this trail because it was icy and slippery and the trail is incredibly narrow. We just took it slow and were careful and it was kind of a fun trail once you got past the being freaked out part.

This next part is easily the hardest part of the hike. The hiking manual made my dad and I laugh because it said “this part of the trail has deterred many an experienced hiker”. The trail essentially just goes straight up the mountain in a curvy path. It’s unreal. I barely took any photos because I was breathing so hard and just sort of forgot I had a camera around my neck. There were a few large-ish snowpacks that I just didn’t get a good photo of, although you can see it in the left corner of one I took of the trail. I think it took us 40 minutes to do one mile. The elevation gain is also killer and I think my dad and I may have both gotten acute altitude sickness because we had terrible headaches. I essentially felt like I was crawling up the side of this mountain. I’ve done many a hike, including half dome and parts of the High Sierra Loop Trail, and this may have been the most difficulty I’ve ever had on a hike. My feelings about it can be accurately described by a man who made it to the top after us. He walked up the sign that signified you made it to the top, yelled “F*CK” at the top of his lungs, and then collapsed into a heap on top of his backpack. Same bro, same.

The summit of Mount Baldy is, as one would expect, quite bald. It wasn’t that windy the day we went up there, but another hiker whom I met at the top who’s done this hike every year for about 20 years told me it can get quite windy. There are piles of stones at the top that I’m sure are there for hikers to sit in and get out of the wind. My dad and I ate a sandwich and some snacks at the top, and then started on our way down.

We took Baldybowl trail on the way down. Another hiker who passed us said she’ll take this way up and down because it’s shorter, but I would never want to hike up this trail because it’s so dang steep. The downhill was almost as bad as the uphill for us, but that’s mainly because my dad and I both have hiking shoes that are over 6 years old and because we didn’t bring any poles with us. If I went on this hike again, I would definitely bring poles. It’s incredibly steep downhill (steeper than the way we took up) and poles would have kept us from sliding as much as we did and having to grab onto rocks every time there was a large drop. Just to give you an idea, there were parts of this hike that went downhill so quickly that I thought it was a water shoot and I was looking around for the actual trail. I would’ve done anything for a switch back.

Along the trail on the way down there are some interesting sights. We got to cross over a tiny stream and I thought it was very cute. There was also a ski lodge built in the 1930’s along the trail that’s owned by the Sierra Club and painted a vibrant green color. It had some chairs out front that were carved out of trees that were, as my dad would say, “nifty”.

After about 4 and a half miles of this death of a downhill trail where I lost a few toenails, you make it back to the fire road and back past the waterfall. I can’t say that I was sad to end the hike at this point, but I’m glad I did this because it was a challenge, I got to spend some time with my dad, and I got to spend an entire day outside after two weeks of being cooped up inside studying for finals. Nature always makes me happy. 🙂

IMG_8584

Thanks for reading! See ya next time folks!